Supporting refresh tokens with Ash Authentication
/ 12 min read
Table of Contents
Recently, I’ve been working a lot with Elixir and have migrated a recent side project to use the Ash Framework, which gives fantastic support for modeling your domain and deriving everything you need from it. Ash Framework provides support for Authentication via Ash Authentication.
Ash Authentication is a pretty modular framework and comes with various strategies, such as magic link or password authentication. For the project I’m working on, I’m powering the backend of a mobile-first application, and I wanted to use password authentication. I won’t go through the whole setup here, as the docs cover it much better than I can, but eventually you’ll end up with a user resource that looks something like this:
defmodule MyApp.Accounts.User do  use Ash.Resource,    otp_app: :my_app,    domain: MyApp.Accounts,    extensions: [AshAuthentication],    data_layer: AshPostgres.DataLayer

  authentication do    tokens do      enabled? true
      # ...    end
    strategies do      password :password do        identity_field :email
        # ...      end    end  end
  actions do    read :sign_in_with_password do      # ...
      argument :email, :ci_string, allow_nil?: false      argument :password, :string, allow_nil?: false, sensitive?: true
      prepare AshAuthentication.Strategy.Password.SignInPreparation
      metadata :token, :string, allow_nil?: false    end
    create :register_with_password do      # ...    end  endend
There is a lot more setup, but this is the gist of what we’ll be working on. With this setup, we get great support for password-based authentication out of the box. For a GraphQL endpoint, this gives us token-based authentication that we can use to authenticate access to the API’s. Each time a request is made to the sign_in_with_password action, a Token is generated and returned with the response.
If we were to set up GraphQL (using Ash GraphQL), then we’d login with a query like this:
query LoginWithPassword { token }}In our response, we’d get an access token. We can then add it to any outgoing request by setting the Authorization header with the value of Bearer #{token}. Our plug would decode and verify the token, ensure it’s not expired, parse out the user and confirm access.
This works great on the web, but it’s not the best experience on mobile as the token only lasts for 14 days, meaning the user would have to reauthenticate themself after the token expires. It’s much more common to use Access and Refresh Tokens in mobile apps. In short, after authenticating, we would return a short-lived access token, similar to what we do today, but also a refresh token that the client can exchange for another access token. In this post, we’ll explore a way to do that with Ash, while still keeping a lot of the really nice benefits that we get from Ash Authentication, such as the ability to store and revoke tokens.
Additional Actions
To implement refresh tokens, we need to augment the existing :sign_in_with_password action to generate a refresh token, and we will also need to add a new action to exchange the refresh token for a new access token.
The lifecycle will be:
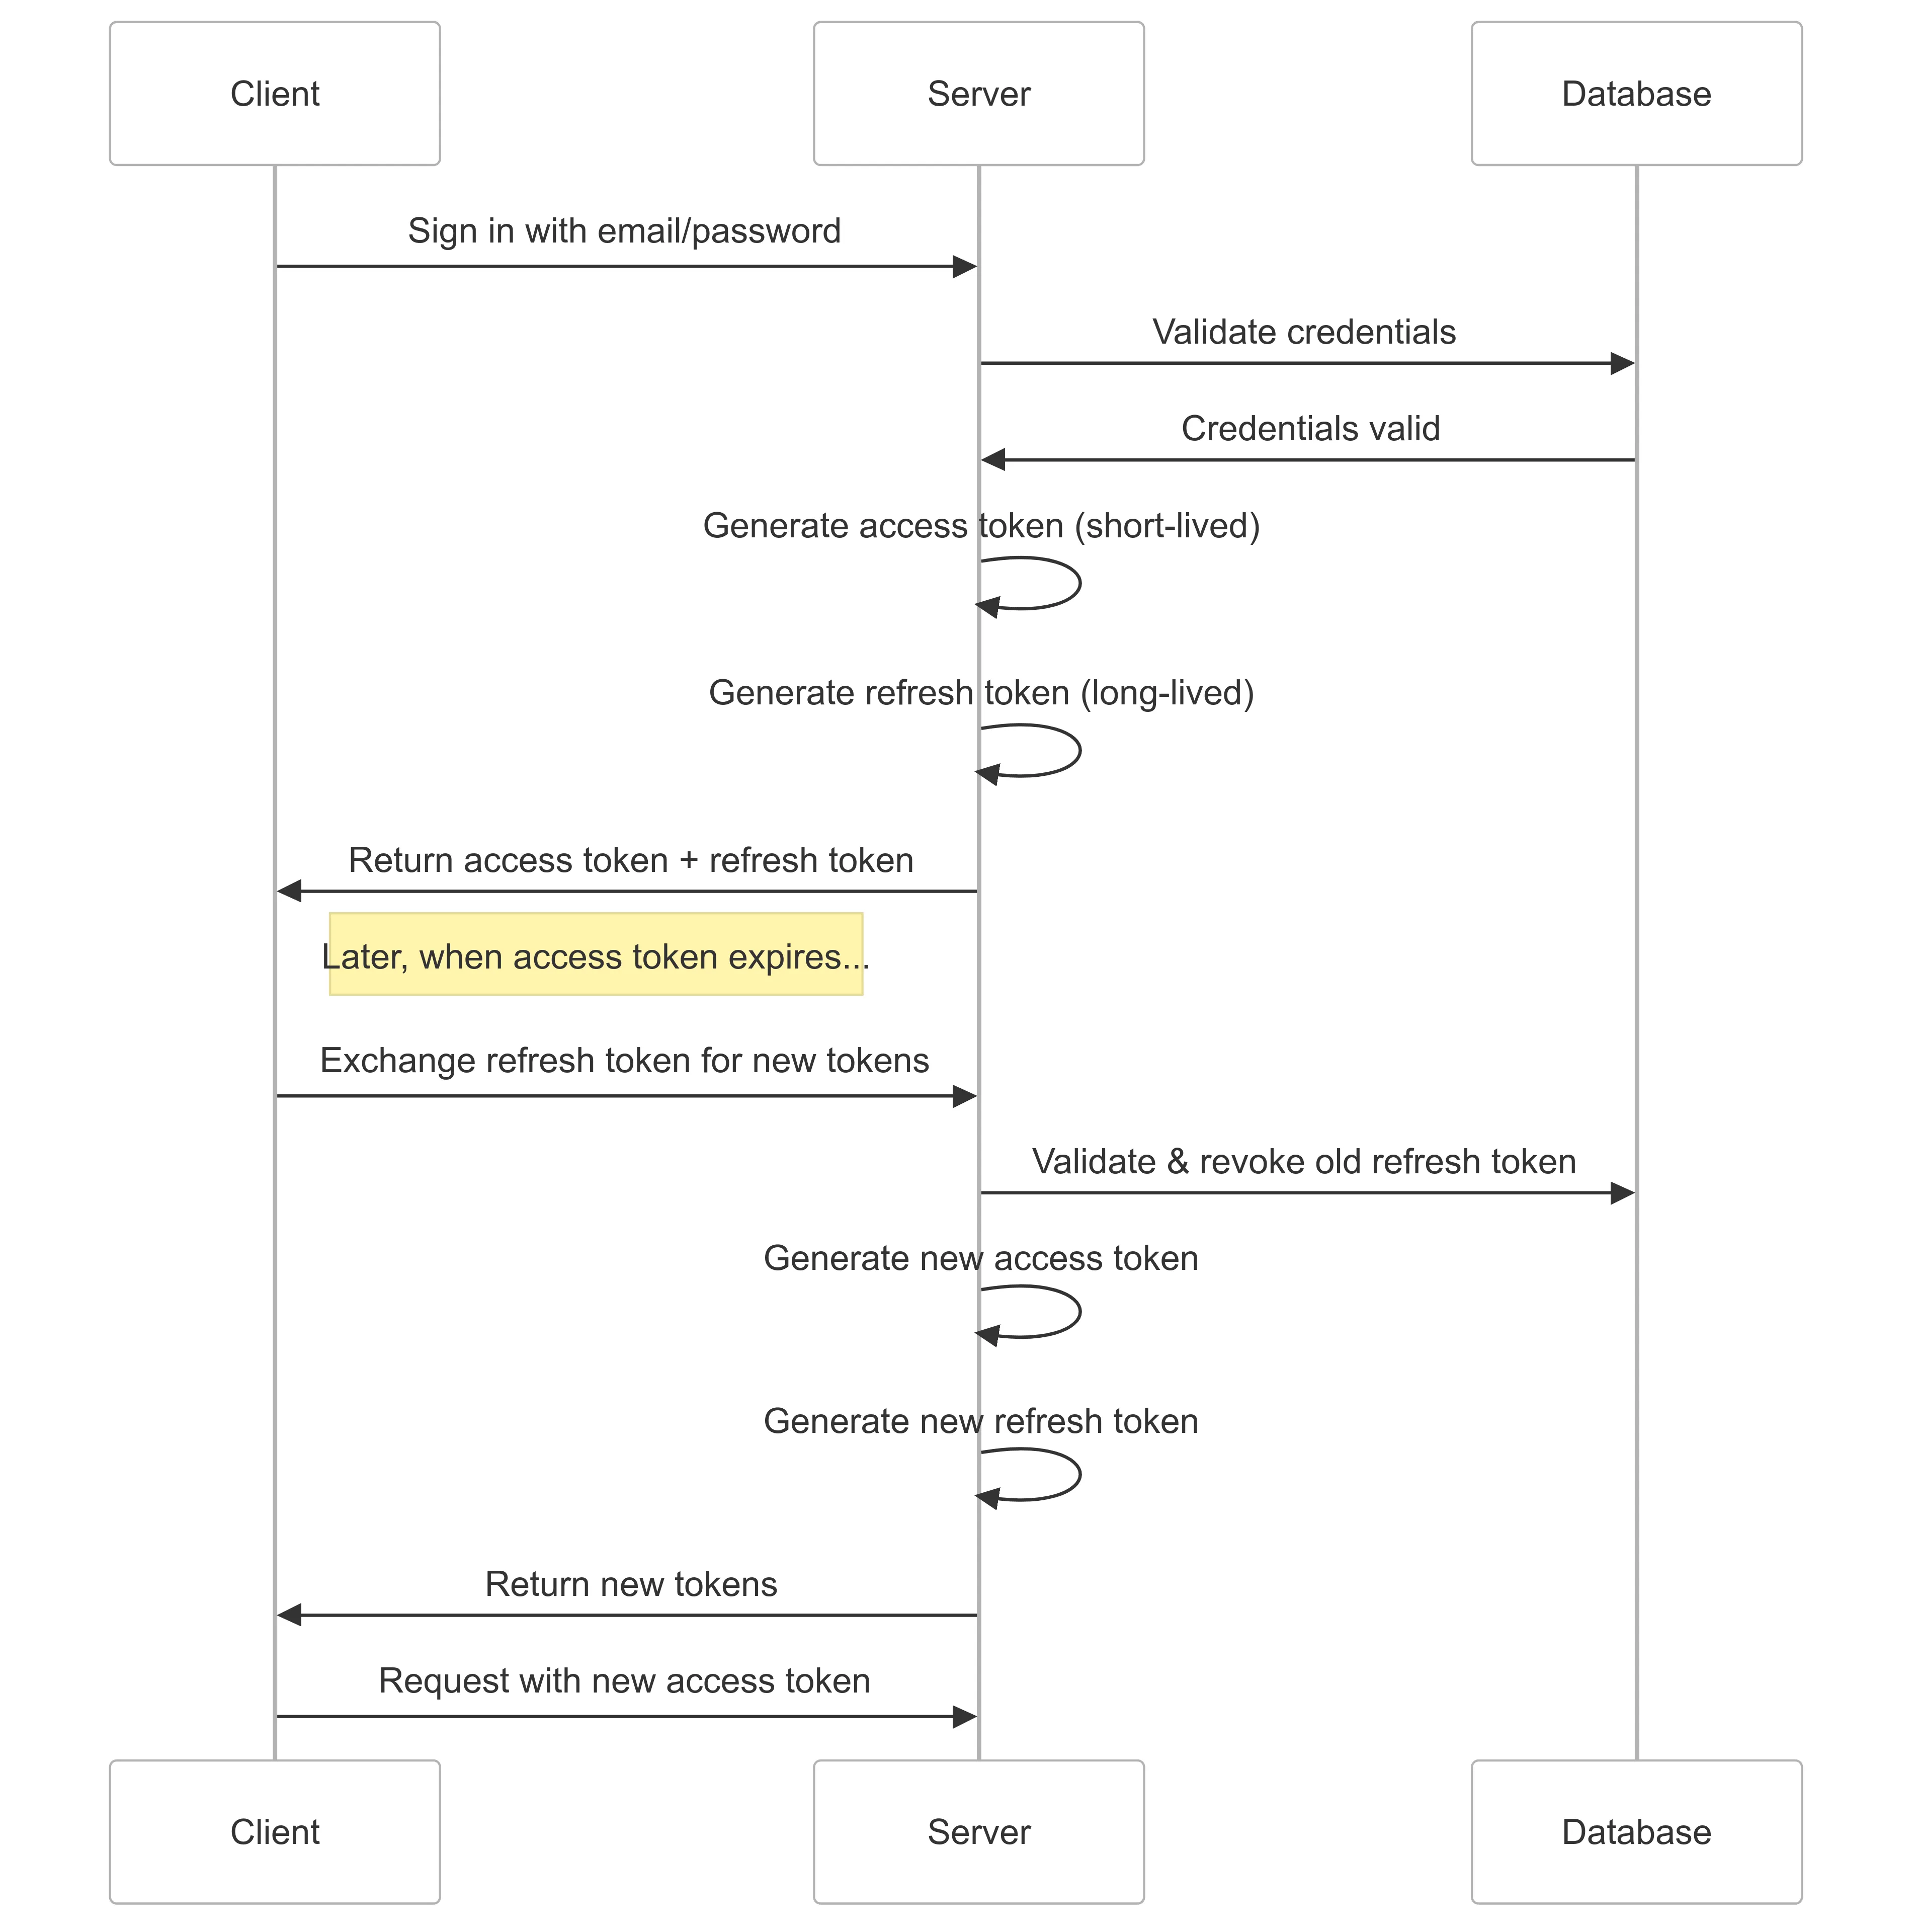
To get started, we’ll take the first step of generating the access token when signing in with a password.
Generating Access Tokens
Fortunately, Ash Authentication password strategy already does a lot of the hard work for us by validating the user and password in a preparation, named AshAuthentication.Strategy.Password.SignInPreparation. This preparation does two jobs, before and after the query executes. The after-job is where the password is verified and the initial access token is generated. Fortunately, there’s nothing we need to do here!
However, if we want to generate an access token, we’ll want to do our own preparation, which we’ll name GenerateRefreshToken. We’ll want to take a similar approach to the built-in preparation, which is to add an after_action hook to generate a refresh token. Tokens in Ash can be generated by supplying a user, a map of additional claims and an optional set of options (such as expiration time).
AshAuthentication.Jwt.token_for_user(user, %{"extra_claim" => "hooray"}, options)
# Returns{:ok, token, claims}
So, let’s get started by writing our own preparation.
defmodule MyApp.Accounts.User.Preparations.GenerateRefreshToken do  require Ash.Query
  alias Ash.{Query, Resource}
  def prepare(query, options, context) do    query    |> Query.after_action(&generate_refresh_token(&1, &2, context))  end
  defp generate_refresh_token(query, [user], context) do    {:ok, [user]}  end
  defp generate_refresh_token(_query, result, _context) do    {:ok, result}  endend
We can then use this preparation in our action by adding it after the SignInPreparation action. New installs of Ash (and the default in Ash 4.0) will execute after_action hooks in the order that they’re declared. To ensure you get that behavior, you’ll want to make sure you’re on Ash 3.4.69 or higher and have config :ash, :read_action_after_action_hooks_in_order?, true set in your configuration. Otherwise, if you’re on an older version of Ash 3.0, you’ll want to make sure your new preparation is declared before the SignInPreparation block.
So, our action should now look something like:
read :sign_in_with_password do  get? true
  argument :email, :ci_string, allow_nil?: false  argument :password, :string, allow_nil?: false
  prepare AshAuthentication.Strategy.Password.SignInPreparation  prepare MyApp.Accounts.User.Preparations.GenerateRefreshToken
  metadata :token, :string, allow_nil?: falseend
The reason we want our after_action hook to execute after the built-in one, is we want to see if there is an access token already generated for the user and placed on that users metadata. If there is, we know that authentication was successful.
Let’s see that in action. Let’s go back to our preparation, specifically our first pattern match:
# The second argument might look a bit weird, but it's because Ash queries always# return lists, even if we're only expecting one user. So, we pattern match on that# and extract the userdefp generate_refresh_token(query, [user], context) do  # Get the token  token = Ash.Resource.get_metadata(user, :token)
  # If token is not nil, then we know that Ash Authentication  # generated an access token for us. Thanks!
  case token do    token when not is_nil(token) ->      # Generate refresh token and add to user metadata      {:ok, refresh_token, _claims} = generate_token(user, context)
      user = user |> Ash.Resource.put_metadata(:refresh_token, refresh_token)
      # Return a list of users, as that is what Ash.Query is expecting      {:ok, [user]}
    other ->      # No token was generated, we should return an error      {:error, "Unable to retrieve token"}  endend
defp generate_token(user, context) do  opts = Ash.Context.to_opts(context) |> Keyword.put(:token_lifetime, {30, :days})
  AshAuthentication.Jwt.token_for_user(user, %{"purpose" => "refresh_token"}, opts)end
Note here that we’re adding some metadata to the user resource. In order to actually read that in our action, we need to add it as a metadata field on the action itself. Let’s modify our action to add the new refresh_token field.
read :sign_in_with_password do  # Existing code...
  metadata :token, :string, allow_nil?: false
  # Add the refresh token  metadata :refresh_token, :string, allow_nil?: falseend
We’ll also want to modify our tokens block to update the token lifetime.
authentication do  ...
  tokens do    # existing config
    token_lifetime {1, :hours}  endend
With this change, our GraphQL schema should update to add the new refresh token to our query:
query LoginWithPassword { token refreshToken }}If we were to execute this query now, we should see both tokens in our response. Nice!
{ "data": { "signInWithPassword": { "refreshToken": "eyJhb...StGg", "token": "eyJhb...FwKM" } }}This is excellent! If we were to take a look at our tokens in iex, we’ll see two tokens for the same user, with different purposes and expiration times. Nice!
iex(1)> AshAuthentication.Jwt.peek("myRefreshToken"){:ok, %{  ...,  "exp" => 1744927645,  "purpose" => "refresh_token",  "sub" => "user?id=myId"}}
iex(2)> AshAuthentication.Jwt.peek("myAccessToken"){:ok, %{  ...,  "exp" => 1742339245,  "purpose" => "user",  "sub" => "user?id=myId"}}
We can see now that we’re getting two tokens back, one a long-lived refresh token of 30 days and the other a short-lived access token of 1 hour. All that’s left now is to support exchanging the refresh token for a new access token. To do that, we’ll want to add a new action to our user resource:
actions do  # existing actions
  read :exchange_refresh_token do    get? true
    argument :refresh_token, :string, allow_nil?: false, sensitive?: true
    metadata :token, :string, allow_nil?: false    metadata :refresh_token, :string, allow_nil?: false
    prepare set_context(%{strategy_name: :password})
    prepare MyApp.Accounts.User.Preparations.ExchangeRefreshToken  endend
Here we’re defining a new action, which takes a single refresh_token argument, and we’re returning two additional pieces of metadata - a new access token, and a new refresh token. Since our initial refresh token was only valid for 30 days, it’s important that each time a new refresh token is requested to be exchanged, we need to not only return a new (short-lived) access token, but also an updated refresh token. This gives us a built-in sliding 30 day expiration, so as long as the user is active within those 30 days, they won’t need to reauthenticate with their username and password.
Now, let’s define this preparation. This preparation will be a bit more involved as we can’t rely on anything Ash did for us already, so let’s dive in. With this preparation we’ll want to do three things:
- Verify the token
- Revoke the old refresh token
- Generate new access and refresh tokens
defmodule MyApp.Accounts.User.Preparations.ExchangeRefreshToken do  use Ash.Resource.Preparation
  require Ash.Query
  alias Ash.{Query, Resource}  alias AshAuthentication.{Info, Jwt, TokenResource}
  def prepare(query, options, context) do    # Get details about this auth strategy. We'll need this for revoking the tokens    {:ok, strategy} = Info.find_strategy(query, context, options)
    query    |> Query.before_action(&verify_token(&1, strategy, context))    |> Query.after_action(&revoke_refresh_token(&1, &2, strategy, context))    |> Query.after_action(&generate_new_tokens(&1, &2, strategy, context))  end
  defp verify_token(query, strategy, context) do    token = Query.get_argument(query, :refresh_token)
    with {:ok, claims, _} <- Jwt.verify(token, strategy.resource, Ash.Context.to_opts(context)),         :ok <- verify_token_purpose(claims),         {:ok, primary_keys} <- primary_keys_from_subject(claims, strategy.resource) do
      # What we've done is verified the token, verified the token purpose and extracted      # the id of the user. We'll now update Ash to query off of this      query      |> Query.filter(^primary_keys)
    else      {:error, reason} ->        Query.add_error(query, [:refresh_token], reason)    end  end
  # Do pattern matching to ensure that _only_ refresh tokens are accepted  defp verify_token_purpose(%{"purpose" => "refresh_token"}), do: :ok  defp verify_token_purpose(_), do: {:error, "The token purpose is not valid"}
  # Our Jwt provides a claim such as `user?id=myId` so let's parse that to  # get the primary key for the user owning this token  # This is taken from the existing AshAuthentication library  defp primary_keys_from_subject(%{"sub" => sub}, resource) do    primary_key_fields =      resource      |> Resource.Info.primary_key()      |> Enum.map(&to_string/1)      |> MapSet.new()
    key_parts =      sub      |> URI.parse()      |> Map.get(:query, "")      |> URI.decode_query()
    provided_key_fields =      key_parts      |> Map.keys()      |> MapSet.new()
    if MapSet.equal?(primary_key_fields, provided_key_fields) do      {:ok, Enum.to_list(key_parts)}    else      {:error, "The token subject does not contain the required primary key fields" }    end  end
  defp primary_keys_from_subject(_, _), do: {:error, "The token does not contain a subject"}end
This is looking good. So far, our preparation is taking the refresh_token argument, verifying it and extracting the subject details out of it, and telling Ash.Query to only query for users with that primary key.
Next, we’ll want to implement our two after_action hooks to actually revoke the tokens and generate new ones. Let’s implement those now.
The first thing we’ll want to do is revoke the refresh token. This is important because we want to make sure our long-lived refresh tokens aren’t easily compromised.
defp revoke_refresh_token(query, [user], strategy, context) do  token_resource = Info.authentication_tokens_token_resource!(strategy.resource)  token = Query.get_argument(query, :refresh_token)
  # Here we asked Ash to tell us what the token resource was, so we can  # easily call the action to revoke it.
  case TokenResource.revoke(token_resource, token, Ash.Context.to_opts(context)) do    :ok ->      {:ok, [user]}
    {:error, reason} ->      {:error, reason}  endend
Now, we’ll want to actually generate the new tokens:
defp generate_new_tokens(query, [user], strategy, context) do  with {:ok, refresh_token, _claims} <- generate_token(user, context),       {:ok, token, _claims} <- Jwt.token_for_user(user, %{"purpose" => :user}, Ash.Context.to_opts(context)) do    user =      user      |> Resource.put_metadata(:refresh_token, refresh_token)      |> Resource.put_metadata(:token, token)
    {:ok, [user]}  else    {:error, reason} ->      {:error, reason }  endend
# Same helper method as in our sign in to generate preparation. It might be worth extracting# this out to a helper method in the futuredefp generate_token(user, context) do  opts = Ash.Context.to_opts(context) |> Keyword.put(:token_lifetime, {30, :days})
  Jwt.token_for_user(user, %{"purpose" => "refresh_token"}, opts)end
Similar to our sign-in action, we are generating new tokens and placing them on the user metadata. This allows the action to expose them to our API. Once we expose this method in our GraphQL schema, we should be able to call it to generate a new access token and refresh token.
query RefreshToken() { refreshToken(refreshToken: "my-refresh-token") { token refreshToken }}If we call this with a valid refresh token, we should get the following response:
{ "data": { "refreshToken": { "refreshToken": "eyJh...Ms_M", "token": "eyJhb...wNe0" } }}If we call that query again with our old refresh token, we’ll get an error, as the previous token was revoked.
Next Steps
This provides us with some pretty basic support for access and refresh tokens, and thanks to existing Ash Authentication functionality, implements several security best practices for us:
- Prevents token replay attacks thanks to revoking refresh tokens
- Reduces attack window as any leaked access tokens are short lived, and refresh tokens are only valid once
A nice enhancement to the above implementation might be to also return the expiration time of the access token. This would allow the client to not have to decode the JWT token themselves to determine the expiration time. That can be achieved by adding an additional metadata field on both actions, and extracting the expiration time from the generated token claim and setting it on the user metadata.
  {:ok, claims} <- Jwt.peek(token)  expires_in = Map.get(claims, "exp")
  user = user |> Resource.put_metadata(:expires_in, expires_in)
An even better next step, which we might explore in a future post, is to extract some of this out to an add-on, so some of the configuration (such as refresh token expiration) can be more easily configured. In addition, I didn’t provide robust error-handling for all of the edge cases in order to keep the post short, and it’d also be a best practice to return more specific AshAuthentication errors throughout. For example:
{:error, AshAuthentication.Errors.AuthenticationFailed.exception( strategy: strategy, query: query, caused_by: %{ module: __MODULE__, strategy: strategy, action: :verify_token, message: "Unable to verify token" })}