Client Side Form Validation With Stimulus and Rails
One of the things I miss the most when working on a non-framework application, such as Angular or Ember, is how easy it is to do form validation. With Angular, you have an in-memory version of your form, and can easily run some Javascript for doing validation.
There are times when you really don’t want or need a full-blown Javascript app, which is where a tool such as Stimulus and server-generated HTML becomes extremely useful.
Fortunately, browsers have a lot of built-in validations that we can use.
I know what you’re probably thinking - the native form validations UI is super ugly and extremely difficult to style. I agree! Fortunately, with a sprinkling of Stimulus, we can hook into the functionality that browsers provide, while doing all of the styling ourself.
Be sure to always validate on the server, even if you're implementing client-side validation
Setting up our Form
We’ll start with a very basic form in any generic Rails application. For this simple example, we’ll scaffold a post that has a title and a slug, both of which will be required fields.
rails generate scaffold Post title:sting slug:string
Let’s take a look at the form that Rails creates for us, and change a few things to add some validation.
<%= form_with(model: post, local: true) do |form| %>
  <div class="field">
    <%= form.label :title %>
    <%= form.text_field :title %>
  </div>

  <div class="field">
    <%= form.label :slug %>
    <%= form.text_field :slug %>
  </div>

  <div class="actions">
    <%= form.submit %>
  </div>
<% end %>
The first thing we’ll want to do is change our form to be a remote form, by removing local: true. This will allow RailsUJS to handle our form submissions for us.
Next, we’ll want to mark our title as a required field. This tells the browser that this form is required, but our form won’t actually enforce it just yet.
<%= form.text_field :title, required: true %>
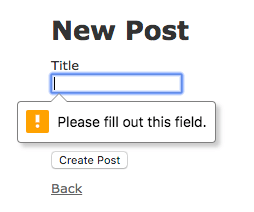
If we load the page and try and submit, we’ll get some pretty nasty looking validation errors.

To remove the ugly validation, add the novalidate: true html attribute to our form. This will turn off any form validation for now, but in the next section we’ll see how we can hook into that functionality with some Javascript and CSS to provide a better user experience.
Here is what our form should look like now:
<%= form_with(model: post, html: { novalidate: true }) do |form| %>
  <div class="field">
    <%= form.label :title %>
    <%= form.text_field :title, required: true %>
  </div>

  <div class="field">
    <%= form.label :slug %>
    <%= form.text_field :slug %>
  </div>

  <div class="actions">
    <%= form.submit %>
  </div>
<% end %>
Add a sprinkling of Stimulus
For the purposes of this article, we won’t go into how to install Stimulus in the rails application. We’ll assume that’s already been done.
Now, we’ll want to create a Stimulus form_controller that we’ll use to hook into the form submit action and manually validate our fields.
import { Controller } from 'stimulus';

export default class extends Controller {
    static targets = ['form'];

    submitForm(event) {
        console.log('form submitted');
    }
}
So far, this is a pretty basic form. We’ve setup a target which will be the form element itself, and created a placeholder action for when the form is submitted.
Let’s go back and modify our form to use this new controller and setup our actions:
<%= form_with(model: post,
              html: {
                  novalidate: true
              },
              data: {
                  controller: "form",
                  target: "form.form",
                  action: "ajax:beforeSend->form#submitForm"
              }) do |form| %>
  <div class="field">
    <%= form.label :title %>
    <%= form.text_field :title, required: true %>
  </div>

  <div class="field">
    <%= form.label :slug %>
    <%= form.text_field :slug %>
  </div>

  <div class="actions">
    <%= form.submit %>
  </div>
<% end %>
What we’ve done is modified our form to add some data attributes. data-controller specifies the name of our newly created Stimulus controller, while data-target tells Stimulus which element is our form. Finally, we use data-action: "ajax:beforeSend->form#submitForm" to tell Stimulus to hook into the Rails UJS event that gets fired.
If we submit our form now, it still goes through without validation, but we should at least see our console.log statement. Now we know we can hook into a form submit, and run whatever code we need to run. Let’s flesh out our submitForm method a bit more now.
Validating the form with Javascript
Fortunately, even though we’ve turned off form validation using novalidate: true in our form, we can still hook into the attributes that the browser applies to the form for us, such as :required or later on, :invalid.
What we want to do is to search our form for any input elements that are required, and check to see if they have any content. Let’s see what that looks like:
import { Controller } from 'stimulus';

export default class extends Controller {

  static targets = ['form'];

  submitForm(event) {
    let isValid = this.validateForm(this.formTarget);

    // If our form is invalid, prevent default on the event
    // so that the form is not submitted
    if (!isValid) {
      event.preventDefault();
    }
  }

  validateForm() {
    let isValid = true;

    // Tell the browser to find any required fields
    let requiredFieldSelectors = 'textarea:required, input:required';
    let requiredFields = this.formTarget.querySelectorAll(requiredFieldSelectors);

    requiredFields.forEach((field) => {
      // For each required field, check to see if the value is empty
      // if so, we focus the field and set our value to false
      if (!field.disabled && !field.value.trim()) {
        field.focus();

        isValid = false;
      }
    });

    return isValid;
  }

}
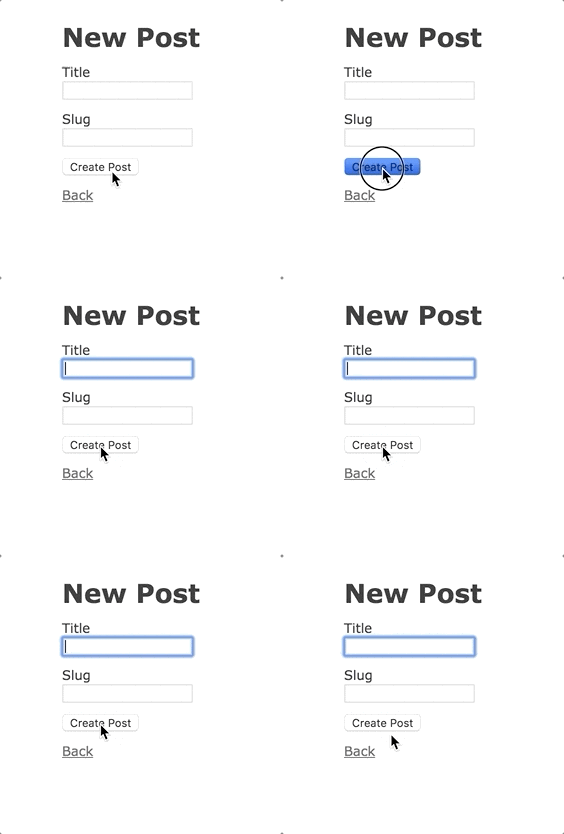
What we’re doing is looking up any required fields and manually checking the value, to see if they have any values. If any required field is empty, then we return isValid as false. In order to tell the Rails UJS library not to submit the form, all we have to do is preventDefault on the event, and the form submission will be cancelled, and the required field will be focused.

Other validation types
Another feature that browsers have these days is pattern validation. We can tell the browser what the required pattern is on an input field, and if the input doesn’t match, we can hook into that validation.
Let’s create an arbitrary example, and say that our post slugs must be required and be alphanumeric.
Here is what our input field for our slug would look like:
<%= form.text_field :slug, required: true, pattern: "[a-zA-Z0-9]+" %>
If we submit now with a valid title and an empty slug, the form submission will still go through. We need to modify our validateForm method to now look for :invalid elements.
  validateForm() {
    let isValid = true;

    let requiredFieldSelectors = 'textarea:required, input:required';
    let requiredFields = this.formTarget.querySelectorAll(requiredFieldSelectors);

    requiredFields.forEach((field) => {
      if (!field.disabled && !field.value.trim()) {
        field.focus();

        isValid = false;

        return false;
      }
    });

    // If we already know we're invalid, just return false
    if (!isValid) {
      return false;
    }

    // Search for any browser invalidated input fields and focus them
    let invalidFields = this.formTarget.querySelectorAll('input:invalid');

    invalidFields.forEach((field) => {
      if (!field.disabled) {
        field.focus();

        isValid = false;
      }
    });

    return isValid;
  }
Just like before, we query the elements in the form for invalid input fields. This time, we don’t need to do any manual validation ourself, as the browser does that for us. When a browser has an invalid field, it adds the :invalid attribute to it, and we can use that for querying and styling. All we have to do is find those elements, focus them and set our isValid property if we find any.
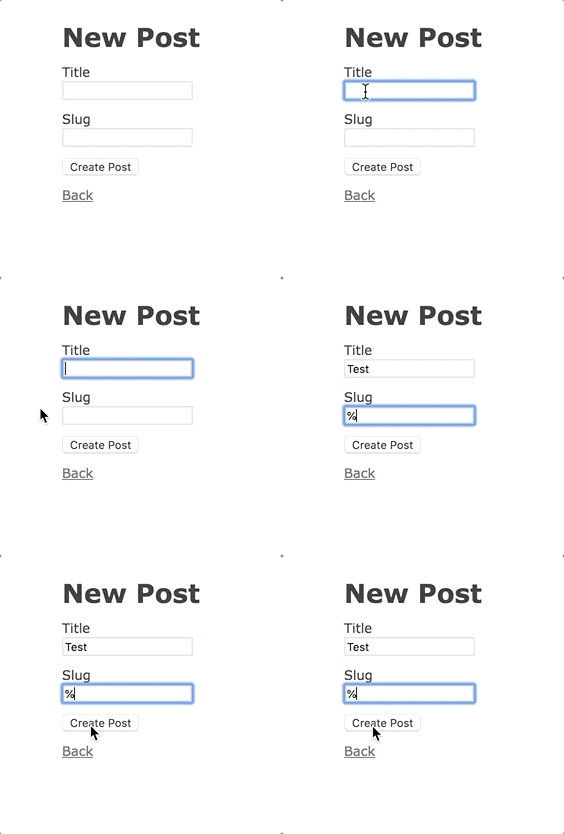
Now, if we try and submit a post with an invalid slug, the submission will be prevented, and the slug field will be focused. Not bad for only a few lines of Javascript!

Wrapping up
As you can see, it’s fairly easy to add some basic form validation using Stimulus. With this technique, there is plenty more we can do, such as adding custom data-attributes for other custom validations, and styling the fields when they are invalid using the input:invalid CSS selector.
It’s worth keeping in mind that although it might seem easy enough to just add validation on the front end, you should always make sure to add the proper model validations on the server.
To see an example, a bare-bones repository used in this example is available on Github at mike1o1/stimulus-validation.